5.10. MIXER
THE MIXER PANEL
The mixer group has 16 'strips', one for each 'track' as in the image below. Each track represents one of the 16 midi channels of the multitimbral midi synthesizer.
Each track can be one of the following:
- An arranger track
- A midifile track
- A left hand track
- A right hand track
As and example: RIGHT1 below is MIDI Channel 13
| Try a table version | |||
| Strip | Arranger | MID/KAR Play | |
|---|---|---|---|
| Number | Track Name | MIDI channel | MIDI Channel |
| 1 | Drums | 10 | Track 1 |
| 2 | Percussion | 9 | Track 2 |
| 3 | Bass | 5 | Track 3 |
| 4 | Accomp 1 | 6 | Track 4 |
| 5 | Accomp 2 | 7 | Track 5 |
| 6 | Accomp 3 | 8 | Track 6 |
| 7 | Accomp 4 | 11 | Track 7 |
| 8 | Accomp 5 | 12 | Track 8 |
| 9 | Left 1 | 3 | Track 9 |
| 10 | Left 2 | 4 | Drums 10 |
| 11 | Left 3 | 1 | Track 11 |
| 12 | Right 1 | 13 | Track 12 |
| 13 | Right 2 | 14 | Track 13 |
| 14 | Right 3 | 15 | Track 14 |
| 15 | Right 4 | 16 | Track 15 |
| 16 | 2nd Voice | 2 | Track 16 |
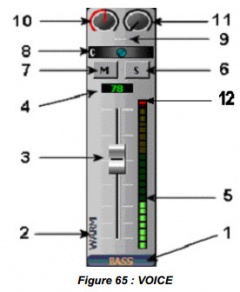
A mixer strip.
| Item | Observations |
|---|---|
| 1 | TRACK 3 in PLAYER MODE or SEQUENCE MODE or BASS ARRANGER |
| 2 | Timbre name assigned to this track. A click on the track turns it red and the vertical column timbres appears to the left for a possible change of timbre. Double-click displays the SOUND EDIT window for any changes. Right-click to display a popup window. |
| 3 | Volume slider. Slide up to increase the sound level is increased, slide down to reduce it. |
| 4 | The sound level set by the volume slider. |
| 5 | The sound meter for this mixer strip |
| 6 | The SOLO button allows you to listen to this one track only. Coloured green when active. |
| 7 | The MUTE button turns off this track. Coloured orange when active. |
| 8 | The PAN indicator shows the left/right setting of the track. C for centre, 64L (left) or 63R (right) at the extremes. Adjust the Panning by moving the dark blue button left or right. A light blue line indicates the position relative to centre. |
| 9 | Shows the name of FX2. Three dashes indicates off. Click on the name to select the FX2 effect to apply to the sound. |
| 10 | A rotary control (*) for effect FX1 that controls the amount of the affect to apply to the track. The red arc indicates the level from 0 to 127(**) Black indicates that no effect is applied |
| 11 | A rotary control (*) for effect FX2 that controls the amount of the affect to apply to the track. The green arc indicates the level from 0 to 127(**) Black indicates that no effect is applied |
| 12 | Shows the Expression level (MIDI control 11) as a red line on the meter of each track. Expression acts as a volume control for the track. |
| * | Click on the knob and slide up or down to change the setting |
| ** | Hover the cursor over the knob to see it's value. |
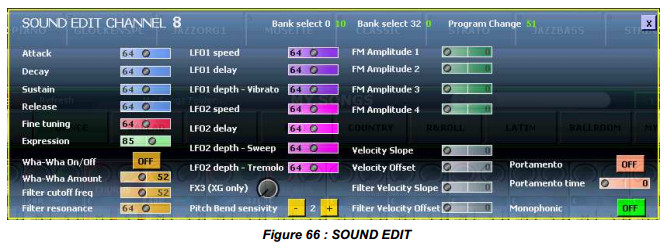
SECTION SOUND EDIT
Double-click on one of the 16 tracks to open the SOUND EDIT window. Once the window is open, a single click on any other track will change the the SOUND EDIT window to that track.
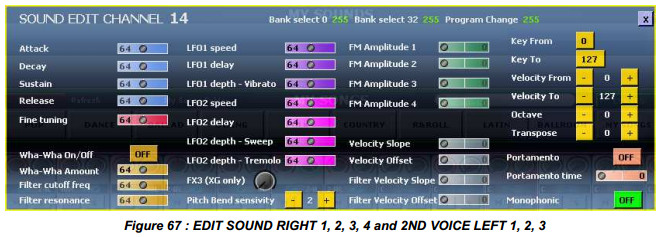
Selecting sounds for the RIGHT 1, 2, 3, 4, 2nd VOICE / LEFT 1, 2, 3 tracks allow you to create simple or multi instrumental presets.
For those tracks, you have access to the following additional parameters :
- A keyboard play area:
- Key From and Key To allow you to select the range of keys(notes) for an action.
- Define the Key From note by clicking on the displayed value and then play the desired note on the keyboard (the note number will be displayed.).
- Define the Key To note by clicking on the displayed value and then play the desired note on the keyboard (which may not be lower than (to the left of) the Key From).
- A velocity range:
- Velocity From Sets the value of the strike force from which the note will be generated. A low value corresponds to "light" the maximum is "Sforzando."
- Velocity To Sets the value of the strike force from which the note will no longer generated. This value may not be less than Velocity From.
- An octave change. up or down.
- A transposition in semitones. up or down.
- Key From and Key To allow you to select the range of keys(notes) for an action.
These tracks allow you, for example, to produce a different tone and a different velocity according to the octave played
Once these parameters are set, you can save the preset using SAVE SOUND.
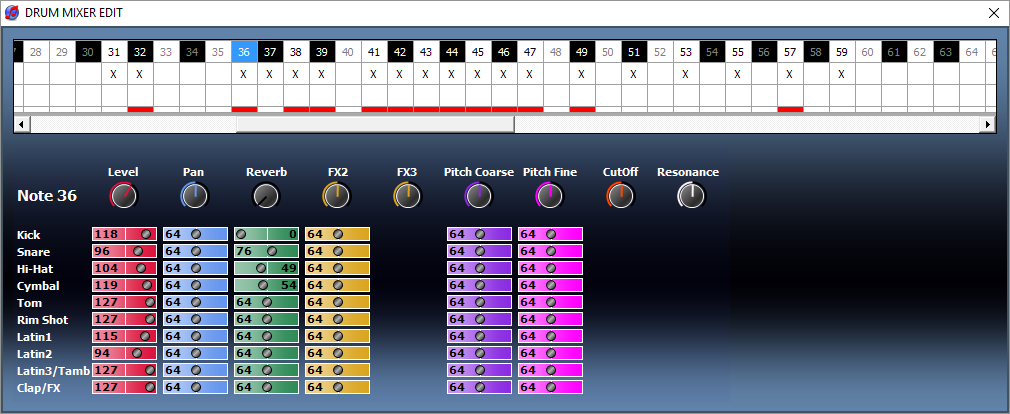
- Additional for the DRUM and PERC tracks only
- Right-click on the DRUM or PERC track and select DRUM MIXER... to access the additional extra settings for the percussion tracks.
Special notes for the BASS track
You may save the MANUAL BASS SUSTAIN. To do this, select Manual Bass, double click on the bass track, and change the value of the Release Time. You can then save this setting in SAVE STARTUP CONFIG.
SAVE SOUND
SAVE RIGHT SOUND is available from the ![]() button
button
By combining up to 5 tracks together (RIGHT 1, 2, 3, 4 and 2nd VOICE), it is easy to create new complex, layered and multi-instrumental presets.
For exemple, click on the RIGHT1 track of the mixer to select the RIGHT1 track, and then select the GRANDPIANO instrument.
Select the RIGHT2 track, and select the STRINGS instrument.
You now have 2 instruments GRANDPIANO and STRINGS playing together ! Easy ?
(If you want to remove and empty one track, you need to select the track, and click on the OFF button, on top/left of the SOUND GROUPS (PIANO, E.PIANO, CHROM...))
You can adjust the volume of each track to find the right balance between the PIANO and STRINGS instruments.
Not only the volume of each track can be adjusted, but also the following parameters can be tweaked and stored with the SAVE RIGHT SOUND:
- Instrument MIDI BANK0/BANK32/PROGRAM CHANGE number (By selecting instrument from the vArranger main screen, or INS screen, or entering numbers manually in the SOUND EDIT screen)
- MIDI OUT PORT (Right click on the track. This allow you to play sounds from multiple midi synthesizer and VST instruments together)
- Volume
- Track ON / OFF
- Transpose (To play at different octaves)
- Pitch Fine tuning (Playing 2 sounds together having a small pitch difference is an interesting effect)
- Pan (Place instruments in the stereo field)
- FX1 (Reverb, ... send amount)
- FX2 (Chorus, ... send amount)
- FX3 (Delay, ... send amount)
- Key From / Key To (To created splits, and play different instrument in different keyboard range)
- Velocity From / Velocity To (To play different instruments if you play the keyboard harder)
- Velocity Offset (Usually at 0, but you can add use 127 or any other value if you want to control the volume of the instrument with a separate expression pedal or breath controller)
- Use Expression (If you want this track to react to the Expression volume pedal)
- Use Sustain (If you want this track to react to the Sustain pedal)
- Use Aftertouch (If you want this track to react to the Aftertouch)
- Attack / Decay / Sustain / Release (= Also called ADSR Enveloppe. Nice to add slower attack and release to the sound)
- CutOff Frequency and Resonance
- The Pitch Bend Range
- Portamento ON/OFF - Portamento Time
- Monophonic
- Harmony options
- And for the Ketron SD2 : WahWahOnOff / WahWahValue / LFO1Speed / LFO1Delay / LFO1Vibrato / LFO2Speed / LFO2Delay / LFO2Sweep / LFO2Tremolo...
CONTEXT MENU TRACK
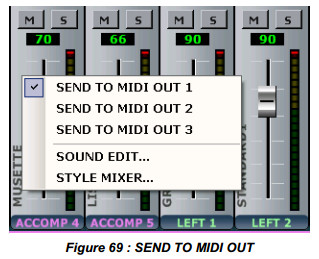
Right click on a track displays a context menu that allows the following selections:
For example, right click ACCOMP4:
SEND TO MIDI
This menu allows you to route MIDI track this information to multiple MIDI outputs, these
choices are not mutually exclusive.
Note : It is possible to use multiple MIDI interfaces with the same names of MIDI ports.
SOUND EDIT ...
See Section 5.10.2 SOUND EDIT
DRUM MIXER
The DRUM MIXER is something useful to tune the drum sounds of the styles.
There is 2 kinds of drum mixers.
1) The PER GROUP DRUM MIXER with the 10 drum mixers groups (Kick, Snare ...) (In the bottom part of the screen) This feature only works with the KETRON SD2 ! (Even the Ketron SD1000 does not react to the drum mixer group messages as the SD2) vArranger loads the drum mixer per group included in the Ketron styles. This drum mixer is global for all DrumKits on all midi channels.
2) The PER NOTE DRUM MIXER when you can set the level, reverb, pan etc.... of every individual notes of the drum kit (In the upper part of the screen) You can actually use it for the Ketron SD2, Ketron SD1000, and the vArranger Software Synthesizer. Most of Yamaha styles includes some individual drum mixer tuning and are displayed in red, so you can easily see what changes are included within the style. You can SAVE DRUM MIXER INDIVIDUAL NOTES with the style too.
Note, for Ketron SD2 users, there is something very important to know : If one individual drum note has been changed from the default value (127 for volumes, 64 for other controls) then the drum mixer per group will have no more effect on this note ! The individual values will ' override ' the per group values. So you need to modify the per note values to your taste, or you can set the note to the default value (127 or 64), and then use the drum mixer per group.
Note, for Ketron SD1000 users. The SD1000 has a round robin feature for drums, so from time to time it triggers another sample for the same key. In fact, it plays another note in the same drum kit, that you need to modify too. For examples, the snare drum note 38, can trigger the following notes 9,10,11,12,13,38,40. So they all need all to be adjusted to the same value.
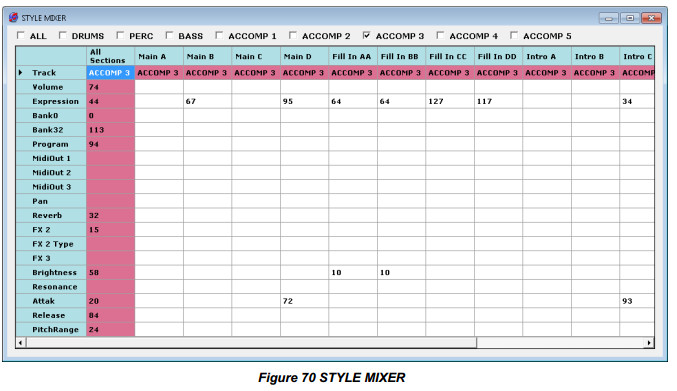
STYLE MIXER ...
This command displays summary screen settings current style for each track, and each
variation.
GROUP MASTER/EFFECTS
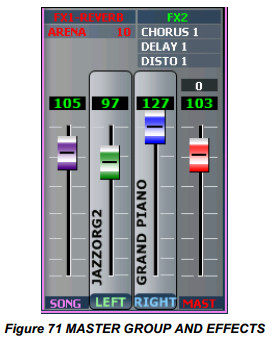
This group contains 4 volume faders and two groups of effects :
The first track named SONG, will adjust the overall volume of a MIDI sequence or an audio file, or accomp tracks of a STYLE (0-127)
The second track named ![]() will adjust the global level of the LEFT section - Tracks LEFT 1/2/3 (0 to 127). This track, when selected, will allow you to display and select all your USERS multi-sounds to change the preset of the LEFT tracks and will display the button
will adjust the global level of the LEFT section - Tracks LEFT 1/2/3 (0 to 127). This track, when selected, will allow you to display and select all your USERS multi-sounds to change the preset of the LEFT tracks and will display the button ![]() in VOICE. This feature allows you to use the LEFT instruments originally present in a Ketron style. A right-click displays
the popup menu cf. 5.10.4.
in VOICE. This feature allows you to use the LEFT instruments originally present in a Ketron style. A right-click displays
the popup menu cf. 5.10.4.
The third track named ![]() will adjust the global level of the RIGHT section - Tracks RIGHT 1/2/3/4/2nd Voice (0 to 127). This track, when selected, will allow you to display and select all your USERS multi-sounds to change the preset of the RIGHT tracks in a click on only one button. A right-click displays the popup menu cf. 5.10.4.
will adjust the global level of the RIGHT section - Tracks RIGHT 1/2/3/4/2nd Voice (0 to 127). This track, when selected, will allow you to display and select all your USERS multi-sounds to change the preset of the RIGHT tracks in a click on only one button. A right-click displays the popup menu cf. 5.10.4.
The fourth fader named MASTER ![]() will act on the overall general master output volume level from 0 to 127.
will act on the overall general master output volume level from 0 to 127.
Above, another digital indicator shows white numerals on a black background, it is the actual use of polyphony,
in other words, the number of notes "ON" sent to the sound module. This allows for example,
whether vA2 is receiving MIDI data from the device connected to MIDI IN.
The first group of effects named FX1-REVERB can select a reverb type from eight types of
which OFF (no reverb). The choice is made by clicking on the name of the REVERB in use, a
drop-down list displays the different reverbs available.
By clicking on the bottom of the window vA2 It clears the combo box without applying the
changes.
The maximum reverb level is adjustable chosen in another drop-down list of values: 0 to 16.
The second effect group named FX2 can choose different types of CHORUS DELAY DISTO to
be applied to different tracks vA2 Eight different types are available including an OFF for all
three FX2 effects. By clicking on the bottom of thewindow vA2 It clears the combo box without
applying the changes.
