5.11. REALTIME ARRANGER
REAL TIME CONTROL ARRANGER
The control of the arranger comes in different views, depending on the origin of the STYLE
loaded, for example:
INTRO
By default, vA2 does not select an INTRO. An INTRO provides up to three variations for the introduction from the simpler (No. 1 or A) to the richest (3, C). The length of the introduction is variable depending on the style, but never less than one measure. The length appears in FRAME A as a blue horizontal progress bar.
With the arranger stopped, select an INTRO pattern (1, 2 or3), and the button turns red. Press START and the arranger will plays the selected INTRO and then step to VARIATION A, or to any other variation you have previously selected.
During your song, you can again replay the INTRO, by simply clicking on the relevant INTRO button..
VARIATION
Depending to the origin of the style, vA2 offers up to four Variations: A, B, C and D or RIFF, and up to five Fill Ins. These variations each have a different pattern of support in general from simple "A" to the richest "D". Some original Ketron styles offer RIFF instead of variation "D".
RIFF is a pre recorded musical phrase of several measures. Up to 32 steps, its length is indicated by the blue horizontal progress bar in FRAME A, the harmonic grid changes in into an agreement with the note played just before entering this variation. This feature is very popular for enhancing the musician's improvisation on a given grid.
The change over is indicated by the blue colour of the button.
FILL IN
Depending on the style, vA2 provides up to three reasons for variations of FILL and BREAK; more for Ketron styles, and up to 5 FILL IN for YAMAHA styles. By default, no FILL IN is selected. The buttons change colour upon selection.
With the Arranger Off, selecting a FILL or BREAK will start the arranger with that the FILL or BREAK.
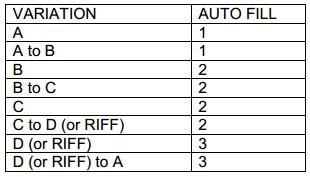
The framework is provided with a button ![]() which turns red when selected. This will then automatically start a FILL when changing a VARIATION according to the following arrangement:
which turns red when selected. This will then automatically start a FILL when changing a VARIATION according to the following arrangement:
ENDING
vA2 provides up to four types of ending, from the simplest to the richest, the length of the ending varies, but is never less than one measure. It appears in FRAME A as the blue horizontal progress bar.
Note : If you start the arranger on an ENDING, vA2 will stop at the end of that pattern.
All commands can be assigned by the arranger menu: OPTIONS -> CONTROLLERS -> CONDUCTOR.
MARKERS
When vA2 reads a sequence, the control panel of the arranger becomes a series of MARKERS which look like the following.
A MARKER is used for finding a precise position within a MIDI file.
vA2 displays the markers present in the MIDI file, in the area of variations arranger. A clicking on a marker
button, sets the MIDI file directly to the start position of this marker.
If the MIDI file is being played, the position change will take place at the end of the measure, for a smooth transition.
This is very useful if, for example, your require and additional chorus. Click on the marker Chorus, and at the end of the current measure vA2 will chain perfectly to that chorus.
In menu OPTIONS -> CONTROLLERS, you may assign up to 15 tags to MIDI buttons, piano keys or PC keys ... (Section MARKERS).
You may also use the functions assigned to VARIATION UP and VARIATION DOWN keys to move through the markers, with the ability to support several steps in a row.
The third option is to use the control usually assigned to variations in key arranger. To do this, use a MIDI file editor and name tags, so that they contain: Intro 1, Into 2 or intro 3, or Ending 1, Ending 2 or 3 or 4, or Main A or B or C or Main Hand D or Fill In 1 or 2 or 3 or Fill In Fill In Break.
For example, if the marker is called "Main C" or "Solo Guitar Main C", you can go to the position of the marker by pressing the button or pedal assigned to arranger variation 3.
NEXT


